Tutorial : Laravel 5 token based Authentication (OAuth 2.0)
PHP OAuth 2.0 Server for Laravel
Note: a fully configured project can be found on this github repo
1. Install oAuth 2.0 Plugin :
https://github.com/lucadegasperi/oauth2-server-laravel
the easiest way to install this plugin is by using Composer .
in composer.js
add the following line (“lucadegasperi/oauth2-server-laravel”: “4.0.x@dev)” ) to require
,
 “require”: {
 “lucadegasperi/oauth2-server-laravel”: “4.0.x@dev”
 }
to download the plugin files , in the project root run :
composer update

Once composer has installed the package,
1.1 add this line of code to the providers array located in your config/app.phpfile:
‘LucaDegasperi\OAuth2Server\Storage\FluentStorageServiceProvider’,
‘LucaDegasperi\OAuth2Server\OAuth2ServerServiceProvider’,
1.2 And this lines to the aliases array:
'Authorizer' => 'LucaDegasperi\OAuth2Server\Facades\AuthorizerFacade',
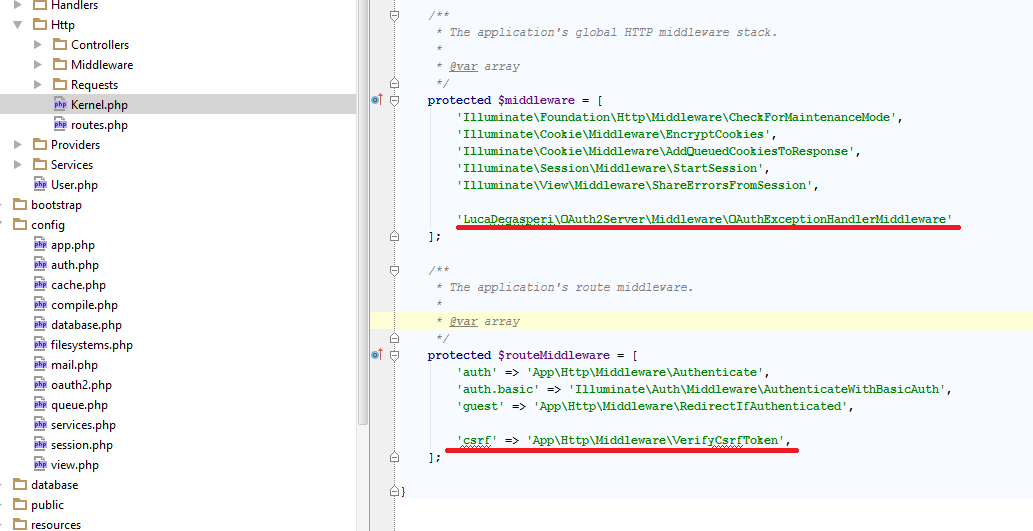
1 .3 open app/Http/Kernel.php then do the following
- Add the following line to your file in the $middleware array
'LucaDegasperi\OAuth2Server\Middleware\OAuthExceptionHandlerMiddleware'
- remove the following line from the $middleware array
App\Http\Middleware\VerifyCsrfToken
- in the same file add the following item to $routeMiddleware Array
‘csrf’ => ‘App\Http\Middleware\VerifyCsrfToken’,
2. Setup the Database :
- first we need to setup database , in the project root find .env file :
DB_HOST=localhost
DB_DATABASE=Mysql database name
DB_USERNAME=Mysql user name
DB_PASSWORD=Mysql password
2. then Run the following command to publish this package configuration and migrations.
php artisan vendor:publish
the previous command will create all migration files that the plugin needs .

3. Run this command to apply migration files on the database
php artisan migrate

3. Configure the OAuth server :
in out server we will use Authorization Server with the Password Grant
- open app\config\oauth2.php and find grant_types Array and add the following code inside it :
‘password’ => [
 ‘class’ => ‘League\OAuth2\Server\Grant\PasswordGrant’,
 ‘access_token_ttl’ => 604800,

 // the code to run in order to verify the user’s identity
 ‘callback’ => function($username, $password){
 $credentials = [
 ‘email’ => $username,
 ‘password’ => $password,
 ];

 if (Auth::once($credentials)) {
 return Auth::user()->id;
 } else {
 return false;
 }
 }
 ]
2. we need a new rout to generate the token after passing the username and password , in app\http\Route.php add the following Route
Route::post(‘oauth/access_token’, function() {
 return Response::json(Authorizer::issueAccessToken());
});
3. Create Client
The client is the app that uses this oAuth server ( eg. website , android app , ..etc )
in the database find the oauth_client s Table , insert new record to it ,or you can use the following SQL code in phpMyAdmin:
INSERT INTO `oauth_clients` (`id`, `secret`, `name`, `created_at`, `updated_at`) VALUES
(‘f3d259ddd3ed8ff3843839b’, ‘4c7f6f8fa93d59c45502c0ae8c4a95b’, ‘Main website’, ‘2015–05–12 21:00:00’, ‘0000–00–00 00:00:00’);
the cliend_id : f3d259ddd3ed8ff3843839b
client_secret : 4c7f6f8fa93d59c45502c0ae8c4a95b
4. create new user ( test ) :
you need to create at least 1 user in users table to test this oAuth server :
i created new rout to create test user ,
Route::get(‘/register ‘,function(){$user = new App\User();
 $user->name=”test user”;
 $user->email=”test@test.com”;
 $user->password = \Illuminate\Support\Facades\Hash::make(“password”);
 $user->save();

});
in your browser go to http://localhost:8000/register ( blank page ) , check database table users you will find new record .
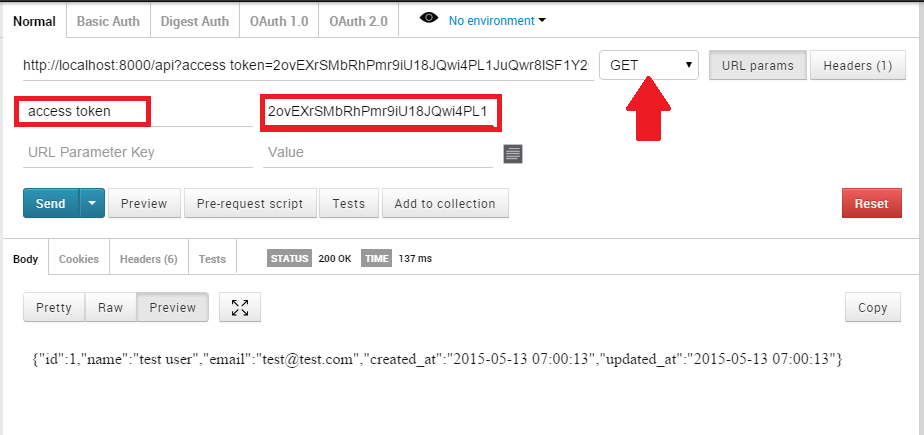
4. test the oAuth server :
to test our server we need REST client to pass the POST request , i recommend Chrome Plugin called PostMan( link) .
after installing postman on chrome you can test out server as follow :
testing data :
 username=test@test.com
 password = password
 grant_type=password
 client_id = GXvOWazQ3lA6YSaFji
 client_secret =GXvOWazQ3lA.6/YSaFji

5. Securing your API endpoints
to protect a resource you can use ‘before’ => ‘oauth’ in the route as follow:
Route::get(‘api’, [‘before’ => ‘oauth’, function() {
 // return the protected resource
 //echo “success authentication”;
 $user_id=Authorizer::getResourceOwnerId(); // the token user_id
 $user=\App\User::find($user_id);// get the user data from database
return Response::json($user);
}]);
to test the REST api route security , use postman plugin :
How to use token in Controller :
assume that we have a Post Controller and the user needs to send a token to get All his Posts .
step 1: Create the route and protect it with oauth , in App\Http\routes.php add the following lines:
Route::group(['prefix'=>'api','before' => 'oauth'], function()
{
    Route::get('/posts',  'PostController@index');
}
i have created route group with prefix ( ‘prefix’=>’api’ ) and protected all the routes inside it with oauth (‘before’ => ‘oauth’).
NOTE : to access the token data, the route must be protected with oauth
step 2 : get the token owner and retrieve the user info , in PostController.php
use LucaDegasperi\OAuth2Server\Authorizer;
public function index(Authorizer $authorizer)
{

       $user_id=$authorizer->getResourceOwnerId(); // the token user_id
       $user=\App\User::find($user_id);// get the user data from database
$posts= \App\Post::where('user_id','=',$user->id);
}
notes: we have injected (Authorizer $authorizer) to the index method to retrieve the owner for the token that the user sent in the request .
Nhận xét
Đăng nhận xét